Makelangelo
I recently spent some more time working on my Drawbot, which is now called a Makelangelo. I don't mind the name change since that makes it easier to find in web searches.
I'm not sure of the source of my renewed interest. Possibly because the awesome folks at MarginallyClever.com are frequently making updates to both software and hardware. Possibly also because, like many makers, every so often I get the urge to make something. Or in this case, improve on what I've already made.
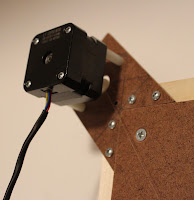
One of the first changes I made was to how the stepper motors were attached. I still like the idea of not attaching the motors to the board directly. I instead attached them to these corner units I created that hang off the board proper. The reason I do this is because I keep thinking I'll make a bigger board eventually. Building these units once and then shifting them to a new board should, in theory, be easy.
Anyway, during a trip to a local hardware store I found some Nylon or plastic "stand-offs" and some longer screws for the stepper itself. I turned the steppers facing into a piece of miter board and drilled a larger hole for the spindle itself. This seemed fairly solid and and stable. It also pulls the string fairly close to the board, which seems like a good thing...? Not sure.
If it matters to anyone, BTW, I use 6 pound test monofilament fishing line. Trilene, I believe. My wife found it at a local sports supply store. I tried 2 pound test (to stretchy) and 10 pound test (too thick). The 6 seems okay, but I wonder if simple thread would be better. Possibly less stretchy or likely to snap in an odd way when it spools over or off of itself. I see on the Marginally Clever site that they have a form of thread for sale, though I will likely just raid my wife's sewing supplies if I try that.
 Another change I made was to the pen-holder. I saw that a new pen-holder had been developed and was for sale on MarginallyClever.com. To my dismay, though, it went out of stock and left their catalog. So I couldn't (at the time) order one. So I built something similar.
What I created is similar to their design, but not completely the same. It's a cross of two pieces of miter board with the pen resting at the apex and held down with zip ties. I drilled multiple holes at the top to give many options for where to tie the lines.

 I also drilled a few holes in the... wings (?) to drop some of the weight. After a couple of tries using it I found out this was a bad idea. As the pen holder wandered over the page it was drawing on, it tended to rattle and bounce a bit.
I later corrected this problem by taping three quarters on either side. My design also includes a servo for pushing the pen out from the board when travelling without drawing. I used the longest piece of plastic I had that came with the tiny little servo.
It works only somewhat well. The pen ends up being a little further in than I think is effective. Further down on any drawn image the pen tends to skip a bit and not write as well. Some soft fabric pads on the two lower skids might help a bit as well.
Since I started writing this I've ordered one of Marginally Clever's versions of the pen holder. Aside from being a better design than what I came up with (or ever will), I'd like to support their efforts. I did not initially need to purchase the entire set since I already had both the motor shield and several Arduino's to use. I feel I am getting an awesome tool for very little money. So I am sending some more their way.
Below is my Arduino and Motorshield. Not much to see.

 Also shown here is a photo of the whole board.
If you look really close you can see some lines drawn on the board itself. This occurred because I did not have the spindle size right in the software. That and because I did not reel in my line in the right direction.
If I ever... okay, WHEN I build a bigger board, I think I will look into getting some whiteboard paint and paint it that way. I have a nice supply of thin dry-erase markers that I have been using for drawing. Might as well go the rest of the way and make the board capable of being drawn on without permanence. Either that or buy some already painted whiteboard. Not sure where/whether I can get that, but something worth looking into I guess.
I also have ordered some new spindles from Marginally Clever as well. The spindles I currently have I did originally get from them, but they have gotten a little damaged over time. One is a bit warped from my attempts to drill it out a bit more & melting it. The other is cracked from using too large a set screw. Both these issues seem to be affecting images I create a bit.
 Even with some sub-standard equipment I've been able to create some fairly accurate drawings. Here's a standard Fibonacci image/g-code file they include with the software.
As you can see it's a bit wonky. I suspect this is due to problems with the spindles, but my pen holder is probably also a bit to blame.
Aside from adding weight to the pen-holder I also found a suggestion in their forums of pitching the drawing board out a bit so it's not completely vertical but at a bit of an angle. This seemed to help keep the pen on the paper a bit, but I still get some weird jitters occasionally.
Included to the side here also is a video of the above image being drawn.
This g-code file is one of the only ones I could find that would fit comfortably into a standard 8.5 by 11 inch sheet of paper. The rest either expand well beyond the paper or even the drawing board.
I am not sure how to get these files to scale down to something that'll fit the page. Likely there's some part of the software that helps with this, but I am missing it.
 I have had a bit more luck with importing images and letting the software do it's math and generate the g-code to draw the image.
For the purpose of this post I took an image of a rabbit to use for the conversion. I took the picture while we were on vacation in South Dakota. This particular picture was taken at an outlook over the Badlands. As I was walking back the rabbit was just sitting there off to one side of the walkway. Seemed fairly tame, or at least didn't seem too spooked by all us people walking by. I was able to get down really close and take a picture (the original is above and to the left).

In order to get this into something that'll look okay after the software gets done with it, I cropped and removed almost all the grass.
This produced the image you see to the right.
However the software does it's work, it seems to do better with clear, high contrast images. Anything that's more or less noise just makes the image more difficult to see or distinguish from noise.
 When I loaded this into the software I turned the resolution all the way up. What it produced was something that was a pretty good representation!
If I had to do it again, I might just completely drop out the grass. It doesn't really seem to add anything to the final image except a bit of noise.
I also took a couple of videos of this drawing in progress. Doing drawings like this take quite a bit longer to complete, so after about three minutes I stopped the first video and waited for it to be almost complete. Then I turned the video on the camera back on and caught the last parts of the process.
Now that I have this setup working fairly well, my next steps are to try my hand at creating g-code directly. Or, failing that, locate and find alternate methods of generating g-code from images.
Ultimately I'd like to be able to create a fairly close line drawing of either photos or other images, first trying them here, but later on some sort of CNC. More on that if I get that far...
I'm not sure of the source of my renewed interest. Possibly because the awesome folks at MarginallyClever.com are frequently making updates to both software and hardware. Possibly also because, like many makers, every so often I get the urge to make something. Or in this case, improve on what I've already made.

One of the first changes I made was to how the stepper motors were attached. I still like the idea of not attaching the motors to the board directly. I instead attached them to these corner units I created that hang off the board proper. The reason I do this is because I keep thinking I'll make a bigger board eventually. Building these units once and then shifting them to a new board should, in theory, be easy.
Anyway, during a trip to a local hardware store I found some Nylon or plastic "stand-offs" and some longer screws for the stepper itself. I turned the steppers facing into a piece of miter board and drilled a larger hole for the spindle itself. This seemed fairly solid and and stable. It also pulls the string fairly close to the board, which seems like a good thing...? Not sure.
If it matters to anyone, BTW, I use 6 pound test monofilament fishing line. Trilene, I believe. My wife found it at a local sports supply store. I tried 2 pound test (to stretchy) and 10 pound test (too thick). The 6 seems okay, but I wonder if simple thread would be better. Possibly less stretchy or likely to snap in an odd way when it spools over or off of itself. I see on the Marginally Clever site that they have a form of thread for sale, though I will likely just raid my wife's sewing supplies if I try that.
 Another change I made was to the pen-holder. I saw that a new pen-holder had been developed and was for sale on MarginallyClever.com. To my dismay, though, it went out of stock and left their catalog. So I couldn't (at the time) order one. So I built something similar.
What I created is similar to their design, but not completely the same. It's a cross of two pieces of miter board with the pen resting at the apex and held down with zip ties. I drilled multiple holes at the top to give many options for where to tie the lines.

 I also drilled a few holes in the... wings (?) to drop some of the weight. After a couple of tries using it I found out this was a bad idea. As the pen holder wandered over the page it was drawing on, it tended to rattle and bounce a bit.
I later corrected this problem by taping three quarters on either side. My design also includes a servo for pushing the pen out from the board when travelling without drawing. I used the longest piece of plastic I had that came with the tiny little servo.
It works only somewhat well. The pen ends up being a little further in than I think is effective. Further down on any drawn image the pen tends to skip a bit and not write as well. Some soft fabric pads on the two lower skids might help a bit as well.
Since I started writing this I've ordered one of Marginally Clever's versions of the pen holder. Aside from being a better design than what I came up with (or ever will), I'd like to support their efforts. I did not initially need to purchase the entire set since I already had both the motor shield and several Arduino's to use. I feel I am getting an awesome tool for very little money. So I am sending some more their way.
Below is my Arduino and Motorshield. Not much to see.

 Also shown here is a photo of the whole board.
If you look really close you can see some lines drawn on the board itself. This occurred because I did not have the spindle size right in the software. That and because I did not reel in my line in the right direction.
If I ever... okay, WHEN I build a bigger board, I think I will look into getting some whiteboard paint and paint it that way. I have a nice supply of thin dry-erase markers that I have been using for drawing. Might as well go the rest of the way and make the board capable of being drawn on without permanence. Either that or buy some already painted whiteboard. Not sure where/whether I can get that, but something worth looking into I guess.
I also have ordered some new spindles from Marginally Clever as well. The spindles I currently have I did originally get from them, but they have gotten a little damaged over time. One is a bit warped from my attempts to drill it out a bit more & melting it. The other is cracked from using too large a set screw. Both these issues seem to be affecting images I create a bit.
 Even with some sub-standard equipment I've been able to create some fairly accurate drawings. Here's a standard Fibonacci image/g-code file they include with the software.
As you can see it's a bit wonky. I suspect this is due to problems with the spindles, but my pen holder is probably also a bit to blame.
Aside from adding weight to the pen-holder I also found a suggestion in their forums of pitching the drawing board out a bit so it's not completely vertical but at a bit of an angle. This seemed to help keep the pen on the paper a bit, but I still get some weird jitters occasionally.
This g-code file is one of the only ones I could find that would fit comfortably into a standard 8.5 by 11 inch sheet of paper. The rest either expand well beyond the paper or even the drawing board.
I am not sure how to get these files to scale down to something that'll fit the page. Likely there's some part of the software that helps with this, but I am missing it.
 I have had a bit more luck with importing images and letting the software do it's math and generate the g-code to draw the image.
For the purpose of this post I took an image of a rabbit to use for the conversion. I took the picture while we were on vacation in South Dakota. This particular picture was taken at an outlook over the Badlands. As I was walking back the rabbit was just sitting there off to one side of the walkway. Seemed fairly tame, or at least didn't seem too spooked by all us people walking by. I was able to get down really close and take a picture (the original is above and to the left).

In order to get this into something that'll look okay after the software gets done with it, I cropped and removed almost all the grass.
This produced the image you see to the right.
However the software does it's work, it seems to do better with clear, high contrast images. Anything that's more or less noise just makes the image more difficult to see or distinguish from noise.
 When I loaded this into the software I turned the resolution all the way up. What it produced was something that was a pretty good representation!
If I had to do it again, I might just completely drop out the grass. It doesn't really seem to add anything to the final image except a bit of noise.
Now that I have this setup working fairly well, my next steps are to try my hand at creating g-code directly. Or, failing that, locate and find alternate methods of generating g-code from images.
Ultimately I'd like to be able to create a fairly close line drawing of either photos or other images, first trying them here, but later on some sort of CNC. More on that if I get that far...

Comments
i like you penholder, do you have the draws to make my own?
There is a newer version I like better for the Makelangelo 3. I have purchased some parts from MarginallyClever.com - the timing belt and pulleys - and will be updating my drawing board with those. Not sure yet what I'll do for a pen holder. Probably something similar to what they are using for the Makelangelo 3, i.e. a flat platter with servo and ties to the timing belt. I might make it out of acryllic though...
Post a Comment